Tutorial
Ambidexterity provides through-the-web (TTW) editing of validators, dynamic defaults and vocabularies for Dexterity content types. It also allows you to create custom view templates for presenting those content types.
This tutorial will walk you through the creation of simple validators and dynamic defaults.
Our scenario
We’re going to create a TTW Dexterity content type with two custom fields:
- A string field for a phone number in a standard international format. We’ll validate that field using a regular expression test.
- A date field that will automatically default to the current date.
We’ll also customize the view template for our content type.
Preliminary steps
You should install collective.ambidexterity by adding it to your buildout and running buildout.
Activate it by visiting Add-ons control panel in site setup.
Note
Ambidexterity currently only works with Plone 5.x.
Create a test content type and fields
Visit the Dexterity control panel in site setup.
Add a new content type named Test content type (the name isn’t actually important).
To your new content type, add two fields:
- A string field titled Phone number; and
- A date field titled Start date.
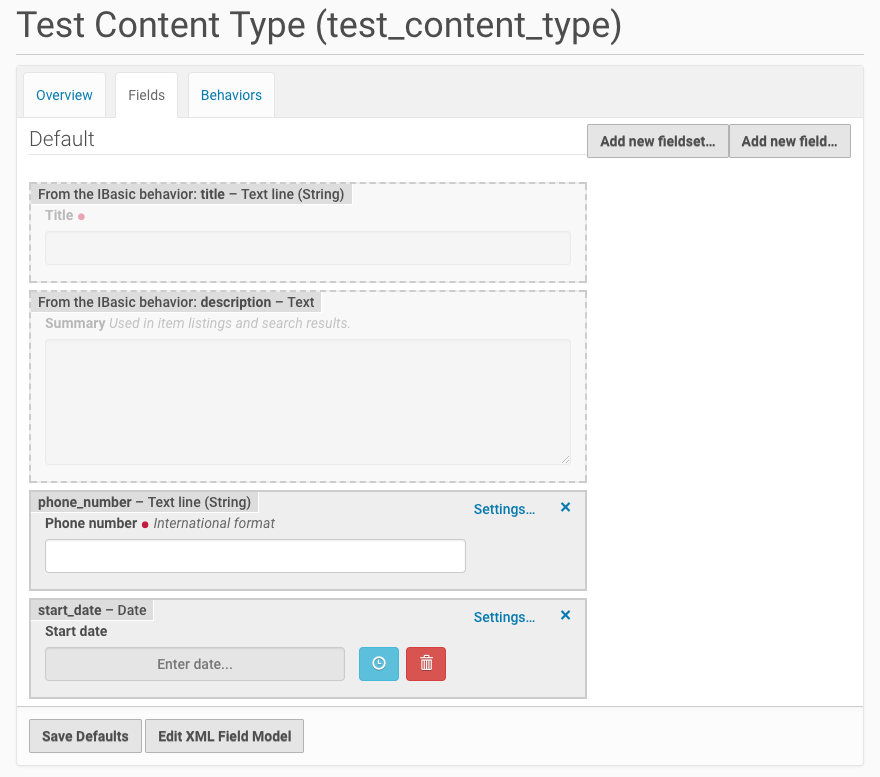
The Dexterity field editor showing our sample content type and its two test fields.
The Ambidexterity editor
Return to Site setup and look to the bottom of the page for the Add-on Configuration section. Select Ambidexterity, giving you a view that should look like this:

The Ambidexterity editor. Note that there is only one option for a built-in content type: to create a custom view.
The Content types drop-down field allows you to select the Dexterity content type on which you wish to act. Other options will appear depending on what Ambidexterity can do with the selected content type.
Varieties of content types
For Ambidexterity’s purposes, there are two types of content types:
- Those defined through-the-web; and,
- Those defined in Python packages, such as Plone’s built-in content types.
For content types defined TTW, we will be able to edit defaults, validators, vocabularies and view templates.
For content types defined in Python packages, we will only be able to edit view templates.
Selecting content types and fields
Use the drop-down Content types to select your test content type:

The Ambidexterity editor: selecting a content type.
Once you’ve selected a TTW content type, a Fields drop-down list will appear. You may use it to select a field for Ambidexterity editing. Only the fields you added will be available; Ambidexterity does not work with fields added through Dexterity behaviors.
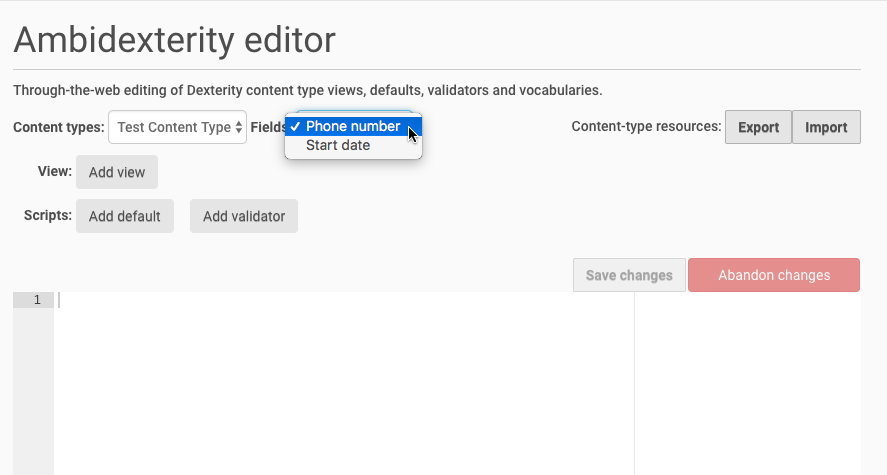
The Ambidexterity editor: selecting a content type’s field. Note that there are new options for our test content type since it was built TTW.
Once you’ve selected a TTW content type and one of your added fields, lots of new script action buttons appear. You’ll have the options to add default, validator and vocabulary scripts. (The Vocabulary script option only appears for Choice and Multiple Choice field types.)
Adding and editing a validator
Select the Phone number field. Press the Add validator button. The Add validator button will be replaced with an Edit validator button. A Remove validator button appears that you may use to remove the validator script.
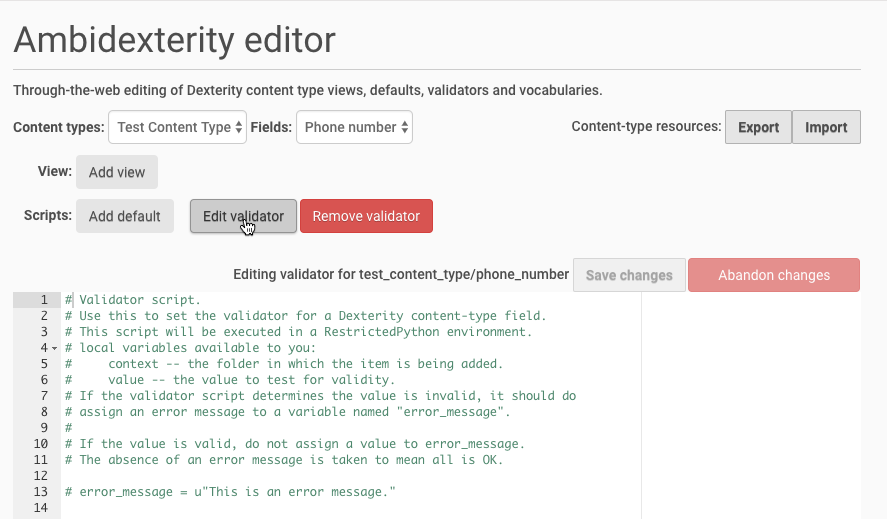
Editing a validator.
The numbered-lines section of the page is now a text editor and contains the code for a sample validator. While editing, we gain buttons to save or abandon changes.
The workings of a validator script
Note
RestrictedPython
All of our scripts are a Python with some special limitations defined by RestrictedPython.
RestrictedPython is meant to provide a safety net for programmers that are not familiar with the Plone/Zope security model. It limits built-in classes, modules and functions. It also controls object database access, limiting access to items that are available to the current user. The current user is not you; if you’re using the Ambidexterity editor, you have great powers (and great responsibility). Rather, the current user will be the contributor adding or editing the content item.
Your validator script has a special global variable, value.
That’s the field value input by the user.
In a validator script, we want to test that value against our expectations.
If it fails the test, we want to return an error message.
Look at the last line in the editor:
# error_message = u"This is an error message."
Change that to read:
import re

if re.match(r"^\+(?:[0-9] ?){6,14}[0-9]$", value) is None:
    error_message = u"Phone number must comply with E.164."
The re regular expression module is one of the few that you may import in RestrictedPython.
It’s particularly useful for validating strings.
The re.match function tests a regular expression against a string.
If the expression matches, a match object is returned.
If there is no match, Python’s None is returned.
Our code looks for that None value.
If it’s found, we set a local error_message variable to a string.
If set, this error message will be displayed on the content item’s edit form.
If error_message is not set, or is set to None, Ambidexterity will interpret that as a sign that the input value is OK.
Now, save it and try it out by adding a test content type item.
Adding and editing a dynamic default
Return to the Ambidexterity editor. Select your test content type and the Start date field. Push the Add default button and watch a sample default script fill the editor.
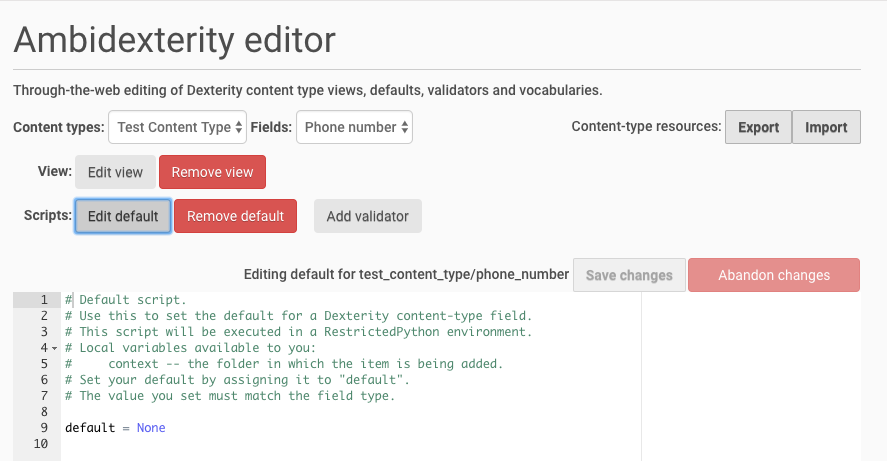
Editing a dynamic default.
For a default script, we want to set a local default variable to the desired value.
Look for the line:
default = None
Change it to:
default = 'Tuesday'
Save your changes and try to add a new item for your content type.
Don’t fear the Traceback
This isn’t what we wanted:
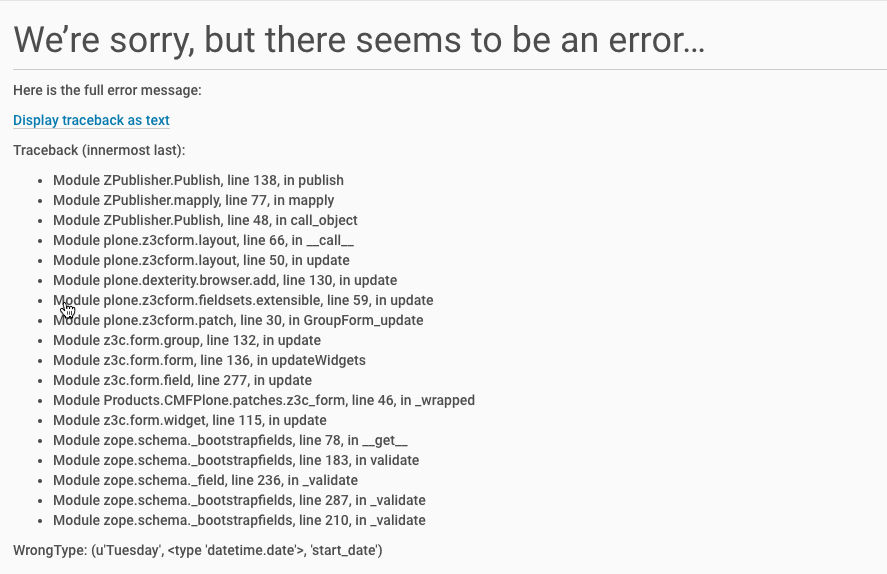
An error adding a content type with a bad default.
If you’ve never done Plone programming before, you may have never seen this on a Plone page. It’s a standard Python traceback. You see it because you’re a highly privileged user; a less privileged user would see a message telling them to contact the site administration.
Here’s the text of our traceback:
2017-10-09 14:35:38 ERROR Zope.SiteErrorLog 1507584938.270.45842617267 http://lumpy:8080/Plone/++add++test_content_type
Traceback (innermost last):
  Module ZPublisher.Publish, line 138, in publish
  Module ZPublisher.mapply, line 77, in mapply
  Module ZPublisher.Publish, line 48, in call_object
  Module plone.z3cform.layout, line 66, in __call__
  Module plone.z3cform.layout, line 50, in update
  Module plone.dexterity.browser.add, line 130, in update
  Module plone.z3cform.fieldsets.extensible, line 59, in update
  Module plone.z3cform.patch, line 30, in GroupForm_update
  Module z3c.form.group, line 132, in update
  Module z3c.form.form, line 136, in updateWidgets
  Module z3c.form.field, line 277, in update
  Module Products.CMFPlone.patches.z3c_form, line 46, in _wrapped
  Module z3c.form.widget, line 115, in update
  Module zope.schema._bootstrapfields, line 78, in __get__
  Module zope.schema._bootstrapfields, line 183, in validate
  Module zope.schema._field, line 236, in _validate
  Module zope.schema._bootstrapfields, line 287, in _validate
  Module zope.schema._bootstrapfields, line 210, in _validate
WrongType: (u'Tuesday', <type 'datetime.date'>, 'start_date')
An experienced Python programmer knows how to read a Traceback. If it’s relatively new to you, the most important thing to know is to start reading from the bottom. The lines at the top of the traceback belong to Plone; one or more lines at the bottom will belong to you. Start at the bottom and read up until you encounter something you own.
In this case, the key line is the last one.
What it’s saying is pretty clear: a datetime.date was expected.
We tried to assign a string, Tuesday, when we should have provided a datetime.date.
The lesson to learn here is that the default you provide must be of a Python type that matches the field type.
Date fields must receive dates (datetime.date), DateTime fields must receive datetime.datetime, integer fields must receive integers.
Return to the Ambidexterity editor, and we’ll fix this.
Change your code to read:
from datetime import date

default = date.today()
datetime is another module allowed in RestrictedPython.
datetime.date.today() returns the current system date.
We know that because datetime is a standard Python module, with full documentation in any handy Python reference.
Save your changes. Try again adding a content type. This one should work.
Adding and editing a view template
If you’ve successfully added a test content item, the current view of the time should look something like:
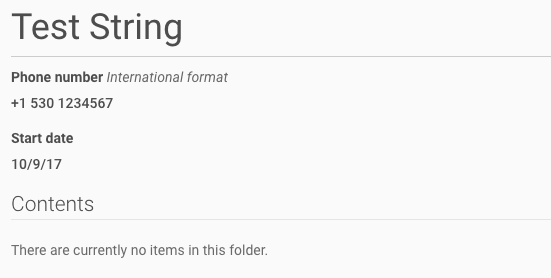
Dexterity’s default view for our content type.
Let’s change that! Return to the Ambidexterity editor; select your content type; push the Add view button. As with scripts, you’ll see the add button replaced with a view button and a new remove button:
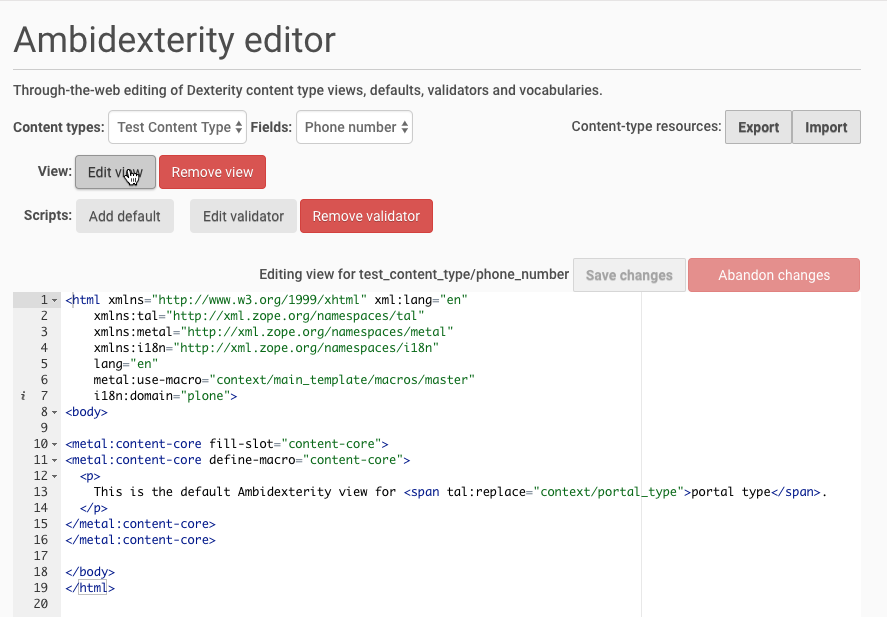
Editing a view template.
The code you’re looking at is a Zope Page Template (ZPT).
It’s standard XML with a few extra XML name spaces.
The TAL namespace is for template attribute language and provides mechanisms for inserting and testing dynamic content.
The METAL namespace is for ZPT macros and allows us to make use of a master page template, only changing the content area.
ZPT is well-documented in it’s Reference. The Plone page templates reference covers its use with Plone, including the workings of Plone’s master page template.
Let’s make a simple change. Look for the core of the content:
<p>
  This is the default Ambidexterity view for <span tal:replace="context/portal_type">portal type</span>.
</p>
and replace it with:
<dl>
  <dt>Phone number</dt><dd tal:content="context/phone_number">value</dd>
  <dt>Start date</dt><dd tal:content="context/start_date">value</dd>
</dl>
This inserts the value of our two custom fields. Save it away and return to your already added test content item. Now it should look like:
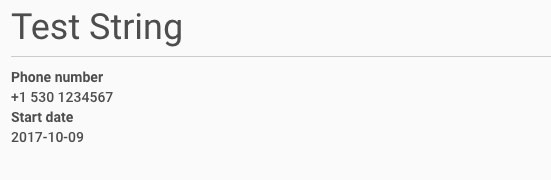
Our update view.
We’ve basically recreated the default Dexterity view of the content item. It’s up to you to make it fancy.